The Carburetor Shop LLC
204 East 15th
Street Eldon, Missouri 65026 Home | History | F.A.Q. | Orders | Contact Us | SELL TO US Carburetors | Repair Kits | Other Parts | Literature | Tools | Articles | Troubleshooting | Carburetor Identification Passenger Kits | Truck Kits | Tractor Kits | Industrial Kits | Marine Kits | Multi-carb set-ups Car Comics | Car Records | Car Trading Cards | Subscription Cards | Oakland and Pontiac Adjustment early updraft carbs (where no
specifications exist) There are many
early carburetors, many of them brass, for which there are no surviving adjustment
specifications (if any ever existed) as to setting the fuel level in the
bowl. The following
procedure has been documented for other carburetors from the same period, and
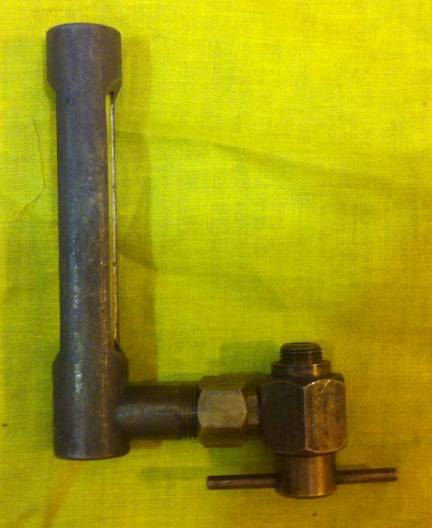
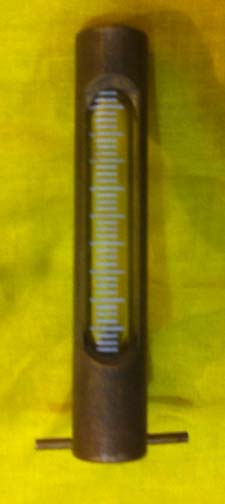
in the absence of original data, provides a good initial adjustment: (1) The tuner
needs what was originally referred to as a burette (picture), but if the
tuner does not have one of these rare and expensive tools, a workable
substitute is possible.
The glass tube is open at the top. A "poor
man's workaround" may be constructed with the use of a couple of brass
fittings, some clear plastic tubing, a hose clamp, and some wire to keep the
tube upright. (2) Once the
special tool has been fabricated, measure the distance from the top of the
carburetor flange, through the venturi to the top of the main discharge
nozzle. (3) Add 1/8
(0.125) inch to the above dimension. (4) On the
outside of the carburetor body, measure from the top of the flange and scribe
(or pencil) a horizontal line using the dimension calculated in step (3). It
should be noted that the horizontal line should be 1/8 (0.125) inch BELOW the
top of the main discharge nozzle. This is the "set point" for the
FUEL LEVEL, NOT THE FLOAT. (5) With the
carburetor assembled, remove the fuel bowl drain plug and attach the special
tool fabricated in step 1 above. If you are bench testing, the "head
pressure" should be the same as what the carburetor will see when
mounted in the vehicle. For those unfamiliar with the term "head
pressure", it refers to the average distance from the fuel in the fuel
tank above the fuel entry point in the carburetor. This is fairly critical,
as the fuel inlet orifice specification depended on the head pressure). In
researching the Stromberg original specifications for early brass
carburetors, a common size 2 (1 1/4 inch) carburetor might have a 0.113 inch
fuel orifice with a head pressure of 18 inches, which was increased to 0.140
if the head pressure were only 8 inches. Failure to consider this issue MIGHT
result in either flooding of the carburetor, or starving the engine for fuel. (6) Add fuel to
the carburetor. Note that since the glass tube (or clear plastic for the
home-made tool) is open at the top, the fuel level in the tube will be
identical to the fuel level in the bowl. Compare this level to the scribed line
from (4). You now have a starting point for adjustment. (7) Many of these
older carburetors have a float valve which has a collar at the top into which
two prongs from the float (or two float followers) was inserted moving the
float valve vertically to open or close. The prescribed method in the old
days was to take a measurement, remove the fuel valve, remove the solder from
the collar, adjust the collar as needed from step (6), re-solder the collar,
put everything back together. One repeated steps (6) and (7) as necessary to
obtain the correct adjustment. (8) HOWEVER (READ
THIS BEFORE DOING STEP (7) ), if the measurement is close, it MAY be possible
to make the adjustment by changing the thickness of the washer beneath the
fuel valve seat. And this is MUCH easier the multiple steps (7). This same
"trick" may be used on newer carburetors instead of bending (and
possibly breaking) a possibly rare and/or expensive float. |