The Carburetor Shop LLC
204 East 15th
Street Eldon, Missouri 65026 Home | History | F.A.Q. | Orders | Contact Us | SELL TO US Carburetors | Repair Kits | Other Parts | Literature | Tools | Articles | Troubleshooting | Carburetor Identification Passenger Kits | Truck Kits | Tractor Kits | Industrial Kits | Marine Kits | Multi-carb set-ups Car Comics | Car Records | Car Trading Cards | Subscription Cards | Oakland and Pontiac Carter WCFB check ball tools I am often asked how to remove the check ball from the pump well in Carter WCFB carburetors. The
standard answer is: clean the casting, check the check ball for movement,
then check that the ball allows fuel to flow in one direction only. If it is
working, leave it alone! But
if it isn’t working, or one is a perfectionist, how does one remove the check
ball. The
check ball is held in place by a check ball retainer, often called a “top
hat”. This retainer is a formed piece of metal in the shape of a brimmed had,
with 2 somewhat hemispherical holes in the top. The retainer is pressed into
a recess in the bottom of the pump well and holds the check ball in place. Carter
released two different special tools to enable one to remove the retainer.
Neither was released in any of the Carter tool kits, not even the Master Kit,
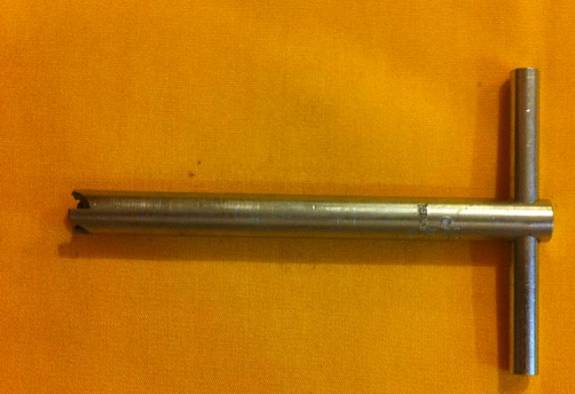
they were special order only, thus both are quite scarce today. The first is
T109-279 (pictured below). This
operational end of this tool resembles a female version of a tapered wood
screw. It has an internal threaded taper, wider at the bottom, and then
tapering toward the top. The top of the tool has a T-handle. One slides a
holed bar (a 12 inch Crescent wrench works fine) over the bottom of the tool,
then threads the tool onto the retainer until tight. The holed end of the
Crescent wrench (or whatever holed bar one has available) is then used as a
slide hammer upward to remove the retainer. I have never used this tool when
it failed to work. Unfortunately, Carter discontinued this tool because it
was quite costly to produce.
The
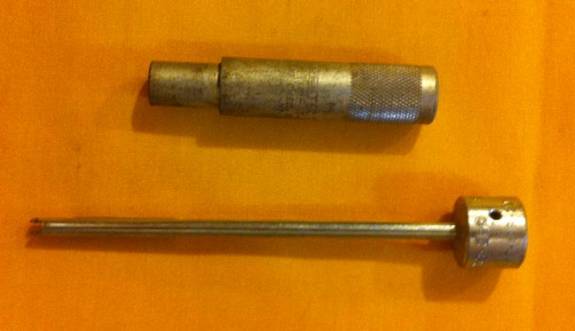
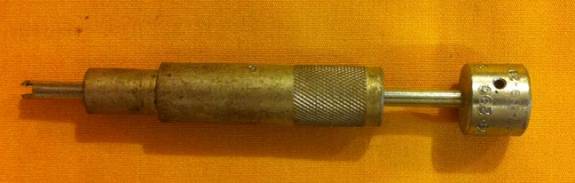
discontinued tool was replaced by T109-292U (pictured below). This is a two-piece
tool that together forms a slide hammer. The inner piece is a long round rod,
with the lower end slotted, and each of the prongs of the slot then cut with
a horizontal slot. The outer piece is simply a slide, completing the slide
hammer. The tool is used by inserting the end of the tool through the
hemispherical holes in the top of the retainer, and then rotating the tool
approximately 90 degrees. This rotation allows the slots in the end of the
tool to lock onto the center bar of the retainer through the 2 holes. The
slide can then be used to hopefully remove the retainer. In using this tool,
patience is one’s friend. Moving the slide in an over-aggressive manner to
quickly remove the retainer results in the center bar breaking. When this
happens, the only method of removing the retainer is using the other tool.
With practice, one can generally remove 80 plus percent of the retainers
using this tool.
While
the T109-292U is scarce, it is more common than the T109-279. AND, a creative
mechanic could actually make one from a steel rod. And
reiterating the second paragraph, if the ball is working, best to leave it
alone if one does not have the special tool(s). |